
|
|
|
|
NOTE !!! If you want to print full description from this section download the Transmitter programming description file. Transmitter setting programme description1. Switching the transmitter into programming mode– disconnect power supply (external and battery) – press and hold TEST button – restore power supply (battery), still holding TEST button pressed for at least 2 sec – release TEST button The transmitter is in programming mode. NOTE: in case of entering a wrong code number or cancelling programming process, you have to repeat the procedure of switching the transmitter into programming mode (protection against unauthorised transmitter parameter programming). Uwaga! – w przypadku wprowadzenia nieprawidłowego kodu, lub anulowania procesu programowania należy powtórzyć procedurę ustawienia nadajnika w tryb programowania (element zabezpieczenia przed próbą nieuprawnionego zaprogramowania parametrów pracy nadajnika)
2. Installing and setting programme’s working parametersInstalling softwareThe software works in DOS 6.22 - Insert the floppy provided by the producer, containing the software for programming transmitters working parameters for TA105, into the drive - Create “TA105” directory on the local disc (usually C:\\) with DOS command “md TA105” and copy files from the floppy there (copy a:\*.* c:\ta105). NOTE: – on the floppy in the BACKUP folder there are copies of all software files. If it turns out that one of the files in the main catalogue is damaged you can use the copy. Starting- DOS system: set “TA105” directory as working (“cd TA105”) and run TA105INS.exe programme - Windows: create a file shortcut to TA105INS.EXE file on the desktop. To run it, double clik on the shortcut icon with the left mouse button.
Working with the programmeAll software options are available for the user from the main menu and can be activated: - with the right/left mouse button - from the keyboard: by pressing simultaneously ALT button and the letter highlighted in the name of the option (eg ALT and P) You can move between the options of the menu using the keys with “up” and “down” pointers. After choosing menu options, a dialogue window opens with a number of parameters to set. Moving between them is possible using TAB button (forward) and SHIFT-TAB buttons (backward). Parameters highlighted in blue can be set by entering the correct value from the keyboard. Option parameters, higlighted in green, are activated and desactivated with SPACE key (enabled “[x]” disabled “[ ]”). You can move between choices using “up” and “down” keys. Inside the dialogue windows the following buttons are available: - “OK” – confirming the set parameters and programming start - “CANCEL” – cancelling programming - “SET” – downloading parameters saved in the floppy file - “SAVE” – registrating parameters set in floppy file
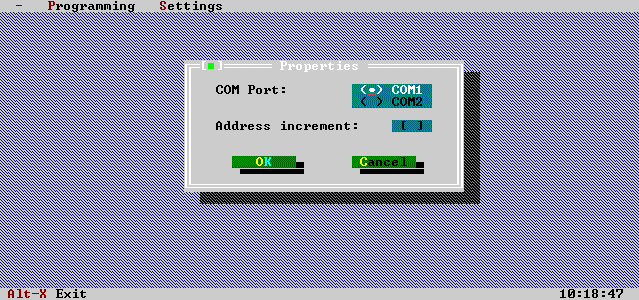
Setting the programme’s working parameters
After confirming with ENTER key, a window will display:
- “COM Port” option allows to choose the active RS232 interface to which the transmitter has been connected. - Choosing “Address auto-increase” causes an automatic increase in value by 1 in the address field of the transmitter during the succeeding programming sessions. After setting programme’s working parameters we can proceed to programming the transmitter. NOTE: If you want to print full description from this section download the Transmitter programming description file. |
|
Zalecana rozdzielczość ekranu 1024 x 768 |